top of page
Slab Building with Slump Mold


Plan:
-wedge clay
-find bowl for mold
-put clay in bowl then smooth out
-let dry then take out
This was my first try at the slump Mold and I was really happy with how it turned out. It did end up breaking in half when I tried to remove the clay from the bowl. I tried to fix it, but it just kept breaking unfortunately. If I were to do this again I would take the clay out of the bowl before it became bone dry so it would be easy to remove.
Coil Building


Plan:
-wedge clay
-use Extruder to make coils
-create spirals
-slip and scored to connect spirals
-add 3D fish
I was actually very happy with how this turned out, and was disappointed when it broke apart. I was not quite sure how to attach the coils together without them getting ruined, but I tried my best. If I were to do this again, I would create a bowl first, and then attach the spirals.
Slab Building with Darts
.jpeg)


Sgrafifto


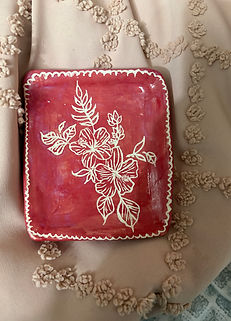
Plan:
-wedge clay
-create small rectangle
-carve out center making a tray
-under glaze
-let dry and carve flower+border
This was my first time attempting sgrafifto and I love
how this turned out. At first I started tracing, but I was
having trouble keeping the paper in the same spot so
I ended up just free handing it. I really like this type
of art because of how precise it can be and very
detailed. If I were to do this again I would probably
spend more time on making the tray itself more even
as well as clean up the border a bit more. But overall,
I really liked the sgrafifto and I hope I get to use this
type of art again.
Relief Carving

.jpeg)

Plan:
-wedge clay
-create bowl
-attach starfish
-create waves on side of bowl
-let dry completely and carve bumps on starfish
-glaze
This is definitely my favorite piece I made this semester. I love the texture of the starfish, and how you can feel the bumps on it. I also am happy with the colors I chose. If I were to do this again, I would make the starfish bigger.
Plan:
-wedge clay
-create cylinder
-cut slivers into bottom and attach
-make rectangle for the bottom
-glaze
I am very happy with how this turned out. At first I did not like how small it was, but after I under glazed it I liked it a lot more. I think the colors I used compliment each other very well. It is the perfect size for a pencil jar on my desk. If I were to do this again, I would try to make it more even and probably make it bigger.
DOWNLOADS
Use this area to upload files you wish to share with your users. You can manage who has access to your files and what they can do, such as view & download, upload items and more.
bottom of page